
| 일 | 월 | 화 | 수 | 목 | 금 | 토 |
|---|---|---|---|---|---|---|
| 1 | 2 | 3 | 4 | 5 | ||
| 6 | 7 | 8 | 9 | 10 | 11 | 12 |
| 13 | 14 | 15 | 16 | 17 | 18 | 19 |
| 20 | 21 | 22 | 23 | 24 | 25 | 26 |
| 27 | 28 | 29 | 30 |
- NGINX
- android
- ubuntu
- techEmpower
- 프래그먼트
- php
- 개발
- error
- caddy
- 해석
- C lanuage
- server
- 번역
- 안드로이드
- 구글
- H2O
- 한글
- mariadb
- javascript
- centOS7
- Portfolio
- MySQL
- 자바
- 컴퓨터과학총론
- unity
- 개발자
- it
- java
- kakao
- C
- Today
- Total
목록client (68)
개발모음집
 Node.JS : WebStorm “require”사용시 Unresolved function or method Error
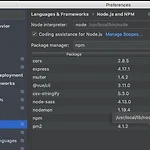
1. Node.JS : WebStorm “require”사용시 Unresolved function or method 2. const path = require('path'); => Node.js coding assistance is disabled 이 두 에러는 preferences - node.js and NPM 에서 coding assistance for Node.js 체크해주면 된다.
webstorm에서 eslint 적용 후 TypeError: this.cliEngine is not a constructor 위와 같은 에러 발생 webstorm 버전을 2018.3.6 버전으로 업데이트하고, eslint 버전을 6.6에서 5.16.0으로 변경하라는 글이 있어서 변경하였더니 에러 해결 변경 방법 1. node_modules/eslint 삭제 2. package.json devDependencies의 eslint 버전을 아래와 같이 변경한 후에 `npm i` 명령어로 eslint 모듈 설치 ... "devDependencies": { "eslint": "^5.16.0" } ... 참고 : https://github.com/eslint/eslint/issues/11957 TypeError: ..
geos = `{"ip": "${parseData.httpData.ip}", "country": "${geo.country}", "city": "${geo.city}", "latLng": "${geo.ll}"}`; return res.status(200).json(`[ ${geos} ]`); // 틀린 코드 geos = `{"ip": ${parseData.httpData.ip}, "country": ${geo.country}, "city": ${geo.city}, "latLng": ${geo.ll}}`; return res.status(200).json(`"geos" : [ ${geos} ]`); // 맞는 코드 geos = `{"ip": "${parseData.httpData.ip}", "country..
- middleware/httpCheck.js export default ({ req, store }) => { if (process.server) { const ip = req.connection.remoteAddress || req.socket.remoteAddress; const userAgent = req.headers['user-agent']; const referer = req.headers['referer']; } }
1. vue-lottie, lottie-web install # npm i vue-lottie # npm i lottie-web 2. 로띠 파일을 보여줄 코드인 lottie.vue 파일을 생성해준다. 출처 : https://github.com/chenqingspring/vue-lottie/blob/master/src/lottie.vue 3. 라이브러리 가이드대로 따라한다. (로띠로 이미지보여줄 json파일도 다운받아야함 https://lottiefiles.com/popular) 참고:https://www.npmjs.com/package/vue-lottie 조심해야할 점 data - defaultOptions: {animationData: animationData} 를 defaultOptions: {ani..
vuetify 예제를 보면서 웹페이지를 만들고 있는데, 예제에 있는 버튼들이 보이지 않았다. 알고보니 Vuetify의 예제들은 일반 버튼을 쓰는게 아니라 material design의 버튼을 쓰는 것이었다. 1. npm 으로 material-design-icons-iconfont 를 설치해준다. # npm install material-design-icons-iconfont 2. // src/plugins/vuetify.js 에 아래와 같이 변경해준다. // src/plugins/vuetify.js // Ensure you are using css-loader import 'material-design-icons-iconfont/dist/material-design-icons.css' import Vue..
Vuetify 1.3 에서 2.4로 업그레이드를 하는데 package.json에서 "vuetify": "^2.0.4"로 숫자를 바꿔준다고 해결이 되지 않았다. 아마 Vuetify가 2.0 버전이 되면서 sass 도입을 한 것 같은데, # npm install sass fibers --dev # npm i sass-loader # npm i node-sass 설치후 아래와 같이 코드를 수정해주면 된다. // v2.0 // src/plugins/vuetify.js import Vue from 'vue'; import Vuetify from 'vuetify/lib'; Vue.use(Vuetify); export default new Vuetify({ icons: { iconfont: 'mdi', }, }); ..
어느날 갑자기 터미널 폰트 사이즈만 커졌다. 그래서 preference - console font size를 바꿨으나 바뀌지 않았다. Preference창을 켜고 Zoom이라 검색한 후 "Change font size (Zoom) with Ctrl+MouseWheel is enabled." 체크해주니 다시 원래의 사이즈로 돌아왔다. Change font size with MouseWheel (called "zooming in the editor") To enable changing font size in the editor Open the Settings/Preferences dialog, expand the Editor node, and click General. Make sure that the se..