su - 를 입력하고 엔터치면 루트 관리자 패스워드를 입력하라고 나옵니다. 루트 관리자 패스워드 입력을 하고 엔터치면 바로 루트 관리자로 로그인합니다.
4. SSH 환경설정파일 수정 $ sudo nano /etc/ssh/sshd_config
nano 텍스트에디터로 SSH 터미널용 환경설정파일을 엽니다. 설정 내용 중 PermitRootLogin without-password 라인을 찾고 아래와 같이 수정합니다. 나노 에디터에서 찾기는 Ctrl키와 W키를 함께 누르면 아래쪽에 키워드로 검색할 수 있습니다. 검색하면 바로 해당 위치 라인에 커서가 이동합니다. 그 다음에 수정하시면 찾는 시간을 줄일 수 있어서 효율적입니다. PermitRootLogin yes StrictModes yes 라인을 찾고 아래와 같이 수정합니다. # 표시는 주석처리로 해당 라인을 비활성화 처리 합니다. #StrictModes yes
nano 텍스트에디터 모드 종료 Ctrl키와 X키를 함께 누르면 에디터 모드가 종료되고 프롬프트 화면으로 빠져나옵니다.
5. Ubuntu 기본 사용자 계정 관련 개인키를 루트 관리자 계정으로 복사 $ sudo cp /home/ubuntu/.ssh/authorized_keys /root/.ssh
6. SSH 서비스 재시작 $ sudo service ssh restart
7. Putty 터미널을 종료 그냥 터미널 창을 닫아 터미널을 종료합니다.
8. Putty 터미널을 다시 새로 띄우기 putty 터미널을 열고 아마존 서버에 접속합니다.
9. 루트 관리자 계정으로 로그인 login as: 가 나오면 root를 입력하고 엔터를 칩니다. 그럼 root 관리자 아이디로 바로 로그인됩니다.
10. 끝. 이제부턴 아마존 서버 접속시 login as : ubuntu로 로그인하지 말고 root로 바로 로그인 하세요.
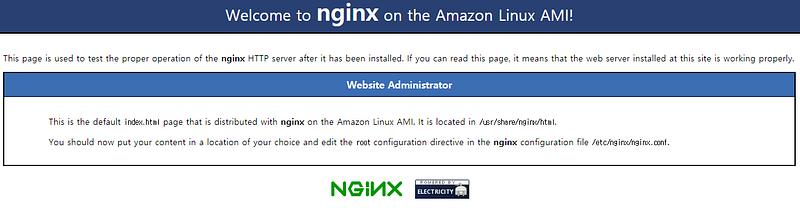
Nginx is available in Ubuntu's default repositories, so the installation is rather straight forward.
Since this is our first interaction with the apt packaging system in this session, we will update our local package index so that we have access to the most recent package listings. Afterwards, we can install nginx:
sudo apt-get update
sudo apt-get install nginx
After accepting the procedure, apt-get will install Nginx and any required dependencies to your server.
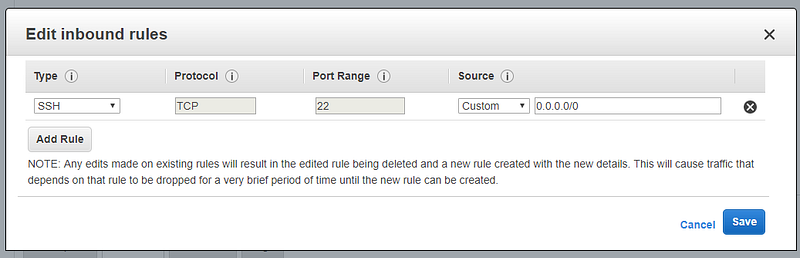
Step 2: Adjust the Firewall
Before we can test Nginx, we need to reconfigure our firewall software to allow access to the service. Nginx registers itself as a service with ufw, our firewall, upon installation. This makes it rather easy to allow Nginx access.
We can list the applications configurations that ufw knows how to work with by typing:
sudo ufw app list
You should get a listing of the application profiles:
Output
Available applications:
Nginx Full
Nginx HTTP
Nginx HTTPS
OpenSSH
As you can see, there are three profiles available for Nginx:
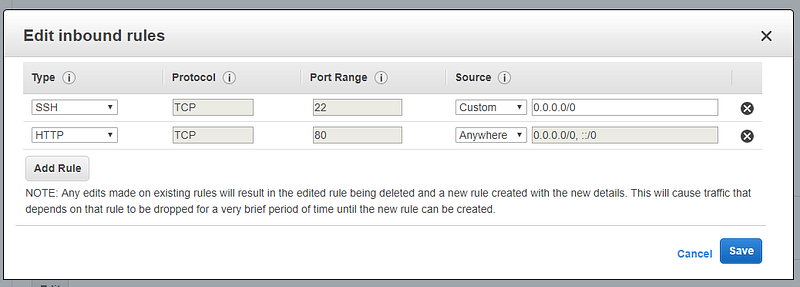
Nginx Full: This profile opens both port 80 (normal, unencrypted web traffic) and port 443 (TLS/SSL encrypted traffic)
Nginx HTTP: This profile opens only port 80 (normal, unencrypted web traffic)
Nginx HTTPS: This profile opens only port 443 (TLS/SSL encrypted traffic)
It is recommended that you enable the most restrictive profile that will still allow the traffic you've configured. Since we haven't configured SSL for our server yet, in this guide, we will only need to allow traffic on port 80.
Relational database management systems are a key component of many web sites and applications. They provide a structured way to store, organize, and access information.
PostgreSQL, or Postgres, is a relational database management system that provides an implementation of the SQL querying language. It is a popular choice for many small and large projects and has the advantage of being standards-compliant and having many advanced features like reliable transactions and concurrency without read locks.
In this guide, we will demonstrate how to install Postgres on an Ubuntu 16.04 VPS instance and go over some basic ways to use it.
Installation
Ubuntu's default repositories contain Postgres packages, so we can install these easily using the aptpackaging system.
Since this is our first time using apt in this session, we need to refresh our local package index. We can then install the Postgres package and a -contrib package that adds some additional utilities and functionality:
Now that our software is installed, we can go over how it works and how it may be different from similar database management systems you may have used.
Using PostgreSQL Roles and Databases
By default, Postgres uses a concept called "roles" to handle in authentication and authorization. These are, in some ways, similar to regular Unix-style accounts, but Postgres does not distinguish between users and groups and instead prefers the more flexible term "role".
Upon installation Postgres is set up to use ident authentication, which means that it associates Postgres roles with a matching Unix/Linux system account. If a role exists within Postgres, a Unix/Linux username with the same name will be able to sign in as that role.
There are a few ways to utilize this account to access Postgres.
Switching Over to the postgres Account
The installation procedure created a user account called postgres that is associated with the default Postgres role. In order to use Postgres, we can log into that account.
Switch over to the postgres account on your server by typing:
sudo -i -u postgres
You can now access a Postgres prompt immediately by typing:
psql
You will be logged in and able to interact with the database management system right away.
Exit out of the PostgreSQL prompt by typing:
\q
You should now be back in the postgres Linux command prompt.
First, ensure your system and apt package lists are fully up-to-date by running the following:
apt-get update -y && apt-get upgrade -y
The -y flag tells apt to go ahead and update the system without prompting you.
This tutorial uses the nano text editor but you may use whichever one you're most comfortable with. Nano is very quick and easy to use and most likely already installed on a barebones Ubuntu system. However, it's a good idea to check just in case:
apt-get install nano -y
Now you're ready to begin installing PHP 7.0.
2. Installing PHP 7.0
Ubuntu installs FastCGI Process Manager, aka php-fpm, by default. To install PHP 7.0 (and php7.0-fpm) the command needed is:
[root@zetawiki ~]# php -r "pg_connect();"PHP Warning: Wrong parameter count for pg_connect() in Command line code on line 1Warning: Wrong parameter count for pg_connect() in Command line code on line 1
[...]
server { listen 80 default_server; listen [::]:80 default_server;
# SSL configuration # # listen 443 ssl default_server; # listen [::]:443 ssl default_server; # # Note: You should disable gzip for SSL traffic. # See: https://bugs.debian.org/773332 # # Read up on ssl_ciphers to ensure a secure configuration. # See: https://bugs.debian.org/765782 # # Self signed certs generated by the ssl-cert package # Don't use them in a production server! # # include snippets/snakeoil.conf;
# 웹루트 기본 경로
root /var/www/html;
# Add index.php to the list if you are using PHP index index.html index.htm index.nginx-debian.html;
server_name _;
location / { # First attempt to serve request as file, then # as directory, then fall back to displaying a 404. try_files $uri $uri/ =404; }
# pass the PHP scripts to FastCGI server listening on 127.0.0.1:9000 # location ~ \.php$ { include snippets/fastcgi-php.conf;
# With php7.0-cgi alone: # fastcgi_pass 127.0.0.1:9000; # With php7.0-fpm: fastcgi_pass unix:/run/php/php7.0-fpm.sock; }
# deny access to .htaccess files, if Apache's document root # concurs with nginx's one # location ~ /\.ht { deny all; } }
[...]
환경 설정이 끝나고 서비스를 리로드 합니다.
service nginx reload
Nignx를 재시작한 후 /etc/php/fpm/php.ini 열어 cgi.fix_pathinfo 설정값을 1에서 0 으로 변경합니다.
vi /etc/php/7.0/fpm/php.ini
[...]
; cgi.fix_pathinfo provides *real* PATH_INFO/PATH_TRANSLATED support for CGI. PHP's
; previous behaviour was to set PATH_TRANSLATED to SCRIPT_FILENAME, and to not grok
; what PATH_INFO is. For more information on PATH_INFO, see the cgi specs. Setting
; this to 1 will cause PHP CGI to fix its paths to conform to the spec. A setting
; of zero causes PHP to behave as before. Default is 1. You should fix your scripts
; to use SCRIPT_FILENAME rather than PATH_TRANSLATED.
; http://php.net/cgi.fix-pathinfocgi.fix_pathinfo=0
[...]